
Previously, we learned how to develop a basic Razor Pages web application using ASP.NET Core framework (which you can find here).
In today’s post, we are going to learn how to deploy ASP.NET Core Application to ISS. While deploying a web app to Windows ISS isn’t difficult, but the ASP.NET Core hosting is bit different than the ASP.NET framework.
The first thing you need to know when creating a new ASP.NET Core application is that they are actually console applications, containing a program.cs file just like a regular ASP.NET console app.
There are also a few more components that are required to deploy & host your ASP.NET Core app to ISS. For instance, first you have to install .NET Core Windows Server Hosting bundle to host your .NET Core application on ISS.
If this is your first time with ASP.NET Core framework, better follow this step-by-step guide to do it right.
Windows Desktop Operating Systems
Enable the IIS Management Console and World Wide Web Services.
1. Navigate to Control Panel > Programs > Programs and Features > Turn Windows features on or off (left side of the screen).
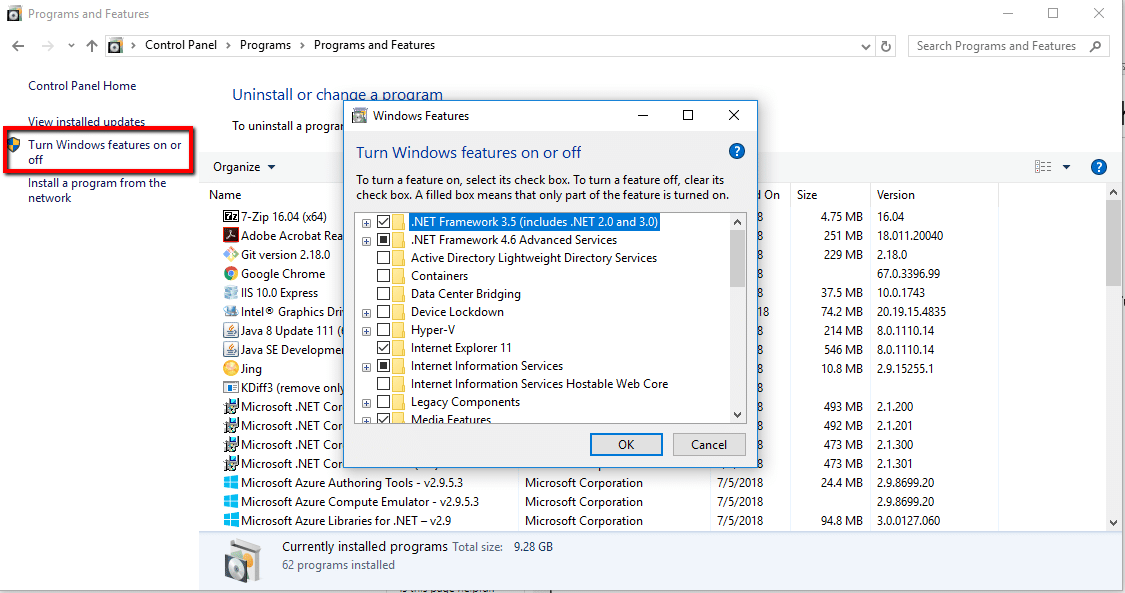
2. Open the Internet Information Services node. Open the Web Management Tools node.
3. Check the box for IIS Management Console.
4. Check the box for World Wide Web Services.
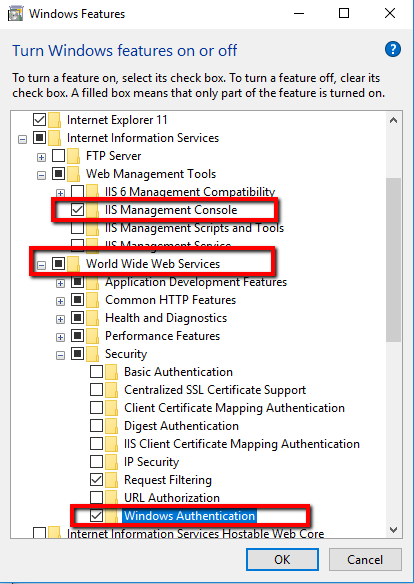
5. Accept the default features for World Wide Web Services or customize the IIS features. Windows Authentication (Optional)
To enable Windows Authentication, expand the following nodes: World Wide Web Services > Security. Select the Windows Authentication feature.
6. If the IIS installation requires a restart, restart the system.
Install the .NET Core Hosting Bundle on the hosting system. The bundle installs the .NET Core Runtime, .NET Core Library, and the ASP.NET Core Module.You can go to the .NET All Downloads page. On the .NET Core runtime download page under Windows, select the Hosting Bundle Installer link to download the .NET Core Hosting Bundle installer and run the installer on the server.
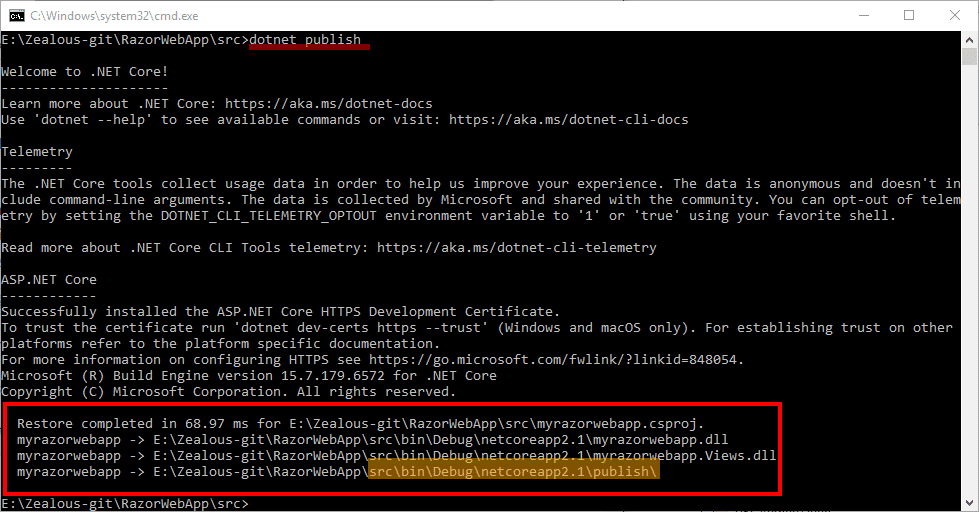
With the .net core it is very simple to publish the application using CLI command.dotnet publish is the command that create a publish package for the application.Technically, definition is dotnet publish – Packs the application and its dependencies into a folder for deployment to a hosting system.dotnet publish compiles the application, reads through its dependencies specified in the project file, and publishes the resulting set of files to a directory.
The output includes the following assets:
The dotnet publish command’s output is ready for deployment to a hosting system (for example, a server, PC, Mac, laptop) for execution. It’s the only officially supported way to prepare the application for deployment. Depending on the type of deployment that the project specifies, the hosting system may or may not have the .NET Core shared runtime installed on it.You can check more at dotnet publish.Target the Powershell command line to the root folder of the application and run the command.
As you can see, the application is successfully installed.
Now to host this app on Windows server, you need to use IIS server.
The default publish folder is bin\$(Configuration)\netcoreapp<version>\publish. The default for $(Configuration) is Debug. In the preceding sample, the <TargetFramework>is netcoreapp2.0
dotnet publish -h displays help information for publish.
The following command specifies a Release build and the publishing directory:
dotnet publish -c Release
Create the IIS site
1. On the hosting system, create a folder to contain the app’s published folders and files. You can simple copy the publish folder created by dotnet publish.
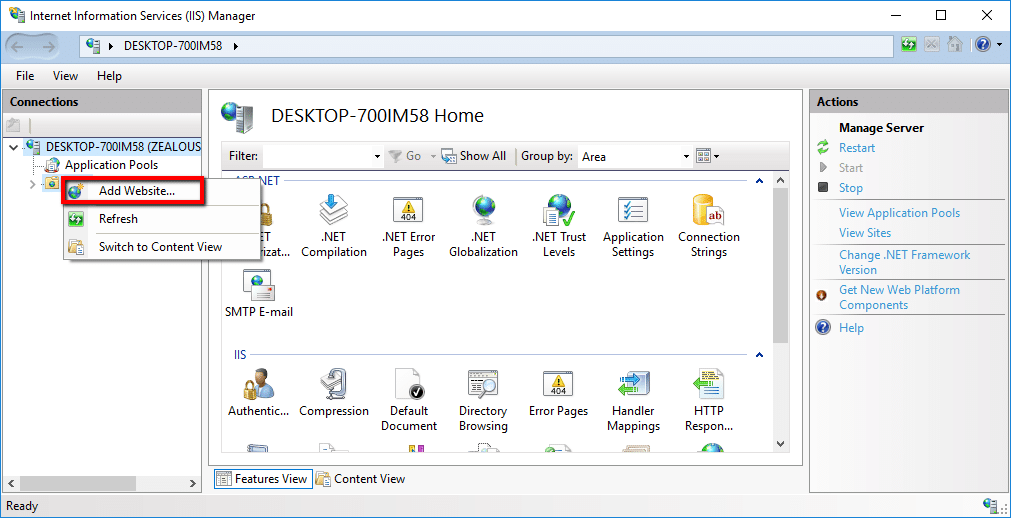
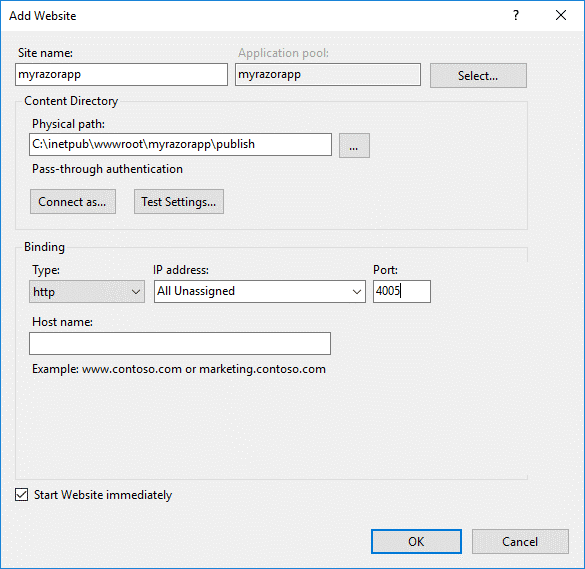
2. In IIS Manager, open the server’s node in the Connections panel. Right-click the Sites folder. Select Add Website from the contextual menu.
3. Provide a Site name and set the Physical path to the app’s deployment folder. Provide the Binding configuration and create the website by selecting OK:
4. Under the server’s node, select Application Pools.
5. Right-click the site’s app pool and select Basic Settings from the contextual menu.
6. In the Edit Application Pool window, set the .NET CLR version to No Managed Code:

Now, the application is hosted on IIS.
The top benefits of using ISS server is that ISS offers higher level of management, configurability, and security. But, the biggest benefit of all is Process management in .NET Core development services. It is mainly because the IIS will automatically start your application if it crashes.
Hope you learned how to deploy ASP.NET Core app on ISS. If you face any issue while implementing it, contact to hire dedicated .NET developers for help.
Our team is always eager to know what you are looking for. Drop them a Hi!

Ruchir Shah is Technology Head at Zealous System with hands-on expertise in AI/ML, Microsoft Azure, .NET, Node.js, Python, React, and Angular. He leads enterprise software development, champions digital transformation, and mentors developers building the future of intelligent apps.


Comments