
In the world that is dominated with mobile apps and modern web applications, HTTP has kind of become a default option for developing feature-rich, robust, and scalable services.
HTTP or the Hypertext Transfer Protocol is basically a set of rules for transferring data on the World Wide Web. In technical terms, HTTP is an application protocol that executes on top of TCP/IP protocol.
The main benefit of HTTP protocol and the reason why it’s popular is because HTTP allows to reach a wide range of clients including mobile apps and browsers. And the Web API makes it easy to build such HTTP services.
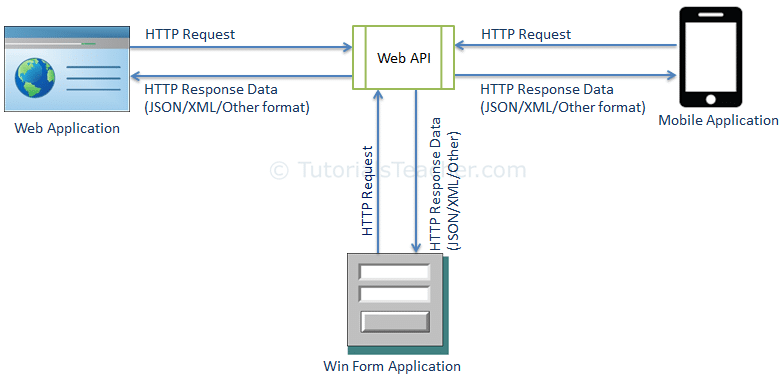
Web API is simply a framework used for developing HTTP based services which can be accessible in different apps on multiple platforms such as windows, web, and mobile.
In the new ASP.NET Core framework, Microsoft and its community have combined the functionality of MVC and Web API.
In this tutorial, we will explain how to create Web API in ASP.NET Core using Entity framework.
Visual Studio 2017 version 15.7.3 or later with the following workloads:
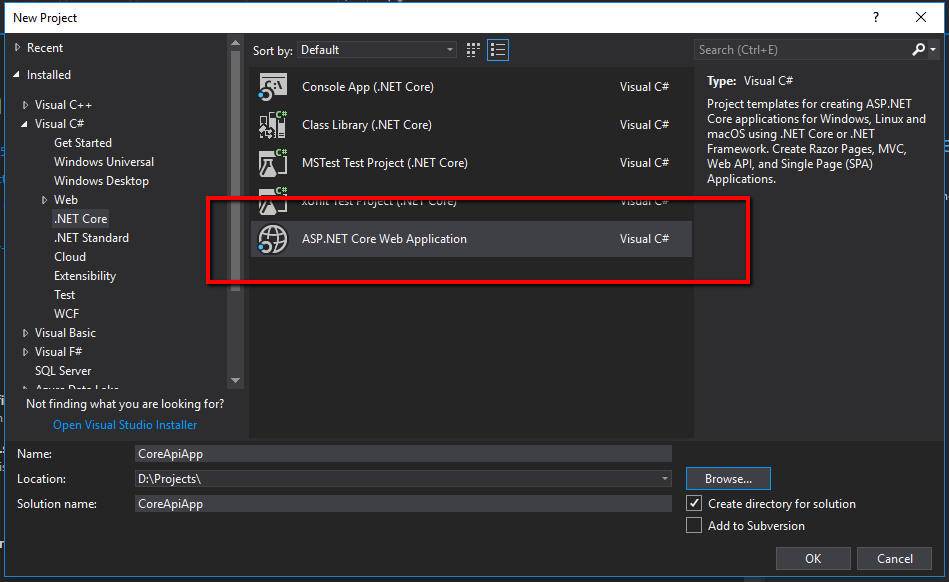
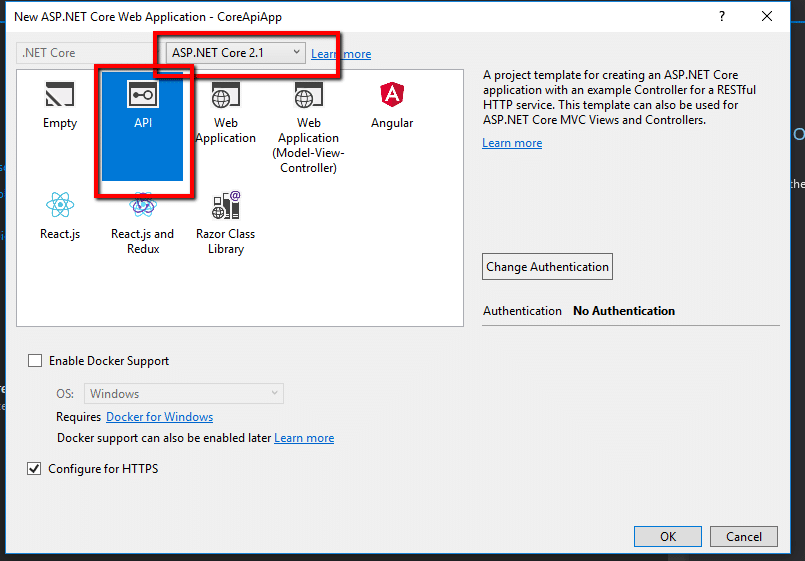
Follow these steps in Visual Studio:
In Visual Studio, press CTRL+F5 to launch the app. Visual Studio launches a browser and navigates to http://localhost:<port>/api/values
Browser display the following output:
[“value1”, “value2”]
To use EF Core, install the some packages for the database provider(s) you want to target.
To install page go to Tools > NuGet Package Manager > Package Manager Console
Generate EF Model through Reverse Engineering model
Scaffold-DbContext
“Server=mssqllocaldb;Database=SocietyManagement;Trusted_Connection=True;” Microsoft.EntityFrameworkCore.SqlServer -OutputDir Models
This will create the Model class which looks like below for our application:
using System;
using System.Collections.Generic;

namespace SMSApi.Models
{
    public partial class Members
    {
        public Guid MemberId { get; set; }
        public string FirstName { get; set; }
        public string LastName { get; set; }
        public string Address { get; set; }
        public int? Gender { get; set; }
        public int? Occupier { get; set; }
        public int? MntncPaidFreq { get; set; }
        public int? Maintenance { get; set; }
    }
}
Add the following using statements : –
using EFGetStarted.AspNetCore.ExistingDb.Models;
using Microsoft.EntityFrameworkCore;
Now we can use the AddDbContext(…) method to register it as a service.
public void ConfigureServices(IServiceCollection services)
        {
            services.AddCors(o => o.AddPolicy("MyPolicy", builder =>
            {
                builder.AllowAnyOrigin()
                       .AllowAnyMethod()
                       .AllowAnyHeader();
            }));
            services.Configure<MvcOptions>(options =>
            {
                options.Filters.Add(new CorsAuthorizationFilterFactory("MyPolicy"));
            });
            services.AddMvc().SetCompatibilityVersion(CompatibilityVersion.Version_2_1);
            var connection = @"Server=192.168.1.95\sql2014;Initial Catalog=SocietyManagement;User Id=flex;Password=flex";
            services.AddDbContext<SocietyManagementContext>(options => options.UseSqlServer(connection));
        }
Here, we have set up CORS for the application add the Microsoft.AspNetCore.Cors package to your project. Using CORS, a server can explicitly allow some cross-origin requests while rejecting others.
We have used CorsAuthorizationFilterFactory filter, to enable CORS globally for all controllers
public void Configure(IApplicationBuilder app, IHostingEnvironment env)
        {
            if (env.IsDevelopment())
            {
                app.UseDeveloperExceptionPage();
            }
            else
            {
                app.UseHsts();
            }
            app.UseCors("MyPolicy");
            app.UseHttpsRedirection();
            app.UseMvc();
        }
To enable CORS for your entire application add the CORS middleware to your request pipeline using the UseCors extension method.
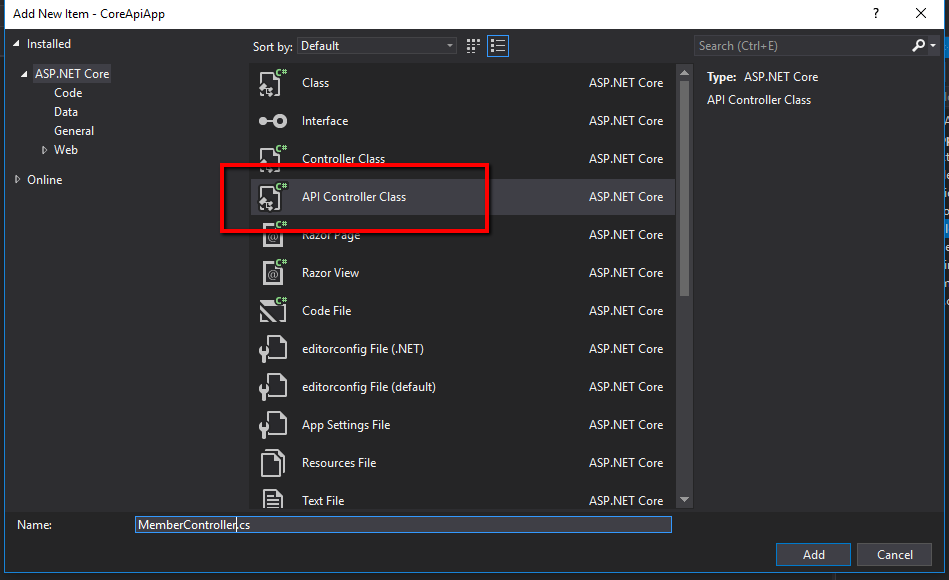
Add a controller
In Solution Explorer, right-click the Controllers folder. Select Add > New Item. In the Add New Itemdialog, select the API Controller Class template. Name the class MemberController, and click Add.
Replace the class with the following code.
[Route("api/[controller]/[action]")]
    public class MemberController : Controller
    {
        private SocietyManagementContext _dbContext;
        public MemberController(SocietyManagementContext context)
        {
            _dbContext = context;
        }

    }
The controller’s constructor uses Dependency Injection to inject the database context into the controller. The database context is used in each of the CRUD methods in the controller. The constructor adds an item to the in-memory database if one doesn’t exist.
Implement the CRUD Operations :
In the following sections, Create, Read, Update and Delete methods are added to the controller.
Open the Controller class and add following code to ge member records.
// GET: api/<controller>
        [HttpGet]
        public IEnumerable<Members> Get()
        {
            return _dbContext.Members.ToList();
        }

        // GET api/<controller>/5
        [HttpGet("{id}")]
        public ActionResult<Members> GetById(int id)
        {
            var item = _dbContext.Members.Find(id);
            if (item == null)
            {
                return NotFound();
            }
            return item;
        }
These methods implement the two GET methods:
Here’s a sample HTTP response for the Get method:
[
    {
        "memberId": "6c06dff2-4557-4f1b-9a6b-724c5fddb27d",
        "firstName": "Santosh",
        "lastName": "G",
        "middleName": "Kumar",
        "mobileNo": 947856324,
        "emailId": "kumar@gmail.com"
    }
]
The [HttpGet] attribute denotes a method that responds to an HTTP GET request. The URL path for each method is constructed as follows:
[Route("api/[controller]")]
    public class MemberController : Controller
    {
        private SocietyManagementContext _dbContext;
In the following GetById method, “{id}” is a placeholder variable for the unique identifier of the to-do item. When GetById is invoked, it assigns the value of “{id}” in the URL to the method’s id parameter.
 [HttpGet("{id}", Name = "GetById")]
        public ActionResult<Members> GetById(Guid id)
        {
            var item = _dbContext.Members.Find(id);
            if (item == null)
            {
                return NotFound();
            }
            return item;
        }
Create: Add the following Create method:
 [HttpPost]
        public IActionResult CreateMember([FromBody]Members model)
        {
            model.MemberId = Guid.NewGuid();
            _dbContext.Members.Add(model);
            _dbContext.SaveChanges();
            return CreatedAtRoute("GetById", new { id = model.MemberId }, model);
        }
The preceding code is an HTTP POST method, as indicated by the [HttpPost] attribute. MVC gets the value of the to-do item from the body of the HTTP request.
The CreatedAtRoute method:
Update: Add the following Update method:
 [HttpPut("{id}")]
        [ActionName("UpdateMember")]
        public IActionResult UpdateMember(Guid id, [FromBody] Members model)
        {
            var member = _dbContext.Members.Find(id);
            if (member == null)
            {
                return NotFound();
            }
            member.FirstName = model.FirstName;
            member.MiddleName = model.MiddleName;
            member.LastName = model.LastName;
            member.MobileNo = model.MobileNo;
            member.EmailId = model.EmailId;
            _dbContext.Members.Update(member);
            _dbContext.SaveChanges();
            return NoContent();
        }
Update is similar to Create, except it uses HTTP PUT. The response is 204 (No Content). According to the HTTP specification, a PUT request requires the client to send the entire updated entity, not just the deltas. To support partial updates, use HTTP PATCH.
Delete: Add the following Delete method:
 	 [HttpDelete("{id}")]
        [ActionName("deleteMember")]
        public IActionResult deleteMember(Guid id)
        {
            var member = _dbContext.Members.Find(id);
            if (member == null)
            {
                return NotFound();
            }
            _dbContext.Members.Remove(member);
            _dbContext.SaveChanges();
            return NoContent();
        }
The Delete response is 204.
In this tutorial, we first created a new ASP.NET Core web application, then created web API using Entity framework, and implemented CRUD operations. If you face any problem while implementing the above steps, you can contact to hire dedicated .NET developers for Microsoft technologies solutions for your projects.
Get a free copy of ASP.NET Core Web API Demo from Github.
Our team is always eager to know what you are looking for. Drop them a Hi!

Ruchir Shah is Technology Head at Zealous System with hands-on expertise in AI/ML, Microsoft Azure, .NET, Node.js, Python, React, and Angular. He leads enterprise software development, champions digital transformation, and mentors developers building the future of intelligent apps.


Comments